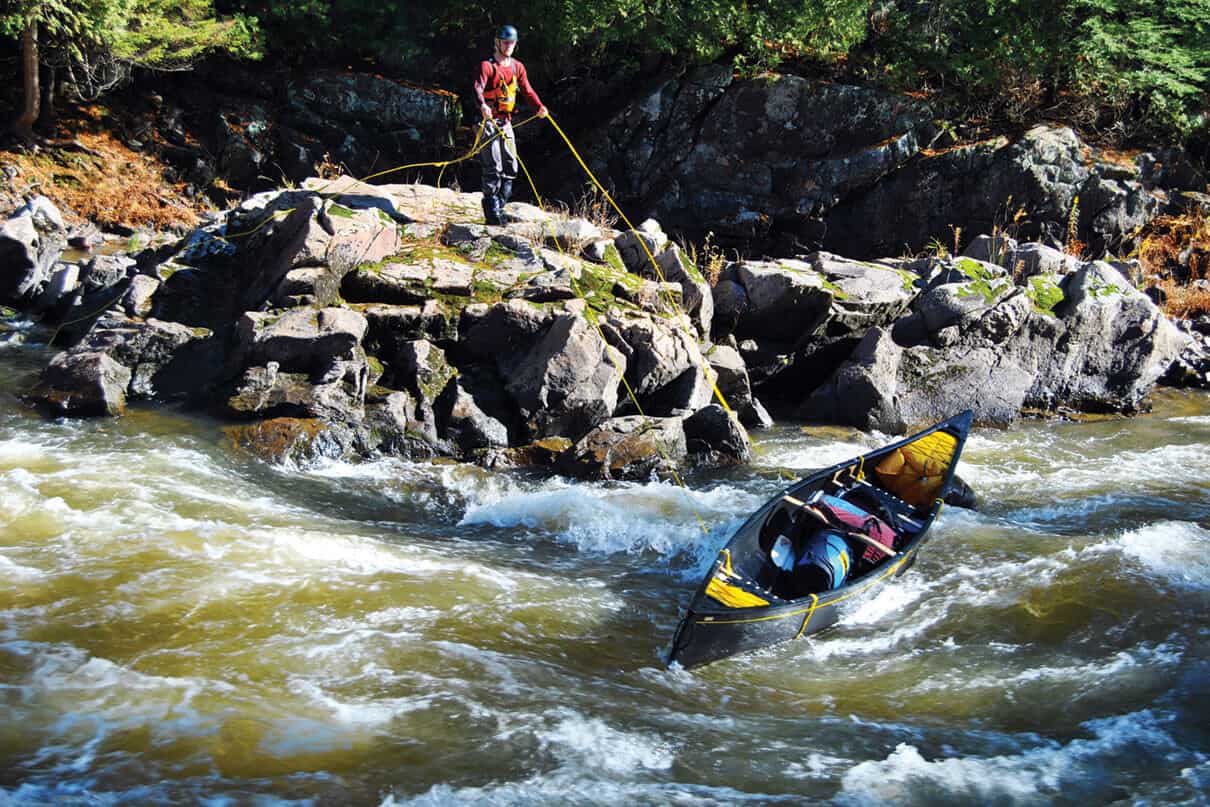
After you line a canoe the first time around that usual portage, your watch and back will thank you for the discovery. Using guide lines to control the descent of a canoe through moving water is an age-old art that can provide a welcome alternative to portaging.
Think of lining rapids as the great compromise. Lining lets you avoid a rapid that is too shallow or tight and technical to paddle, without having to shoulder your load and hit the trail. When lining properly, you use ropes and the force of the current to steer your canoe safely down sets.
Once you’ve come to recognize its potential, you may find yourself lining rapids that you would normally have carried around.
How to line rapids in a canoe
Set up
The simple way to tie a bridle
- Fold back eight feet of rope on the end of your line.
- Tie a double overhand knot halfway up the folded section of rope so that you have a big ‘Y’.
- Tie each of the short ends of the ‘Y’ to either side of the canoe’s seat, positioning the center knot under the canoe at the keel line.
With a bridle at both the bow and stern, and the load slightly rearranged so that the downstream end of your canoe is heavier, you will have a very stable setup.
The ideal rigging requires two 20-metre throw bags and a bridle consisting of a three-metre length of rope with a loop tied at the halfway point. Using a bowline, tie one end of a throw rope to the loop in bridle, slide the bridle under the hull and tie each end off inside the gunwales at a thwart or seat. The loop should be near the keel line and at least a metre from the stern of the canoe.
With this bridle set-up you can control the canoe from below the waterline. Though lining a canoe with the stern line attached to a grab loop near the deck is possible (not to mention common) a strong pull on the grab loop from an angle can flip the canoe (many readers are nodding knowingly right now). The bow rope can be attached to the grab loop of the canoe since it will only be used to control the canoe angle.
If you don’t trust yourself to re-pack throw bags after each use then use a fixed painter on the bow. It should be of large diameter (so it is easy to grip) and both buoyant and free of knots (to reduce the chances of it getting jammed between rocks). 1/4- to 1/2-inch braided floating rope works well.
The length of the lines is dependent on the river and personal preference. Shorter lines are easier to manage but may leave you grasping for a runaway canoe. Longer lines allow you to move the canoe further into the current but may result in tangles if you only use a fraction of their length. Thirty-to forty-foot lines are a good compromise.
Safety
Whenever rope and currents mix you need to be prepared. Both paddlers should have a knife handy in case the rope gets tangled. Leave any excess rope in the bag or in loose coils in your hand. You should be wearing a PFD and if you trip with a helmet there is no sense having it in the canoe and not on your head while you scramble over wet rocks.
Starting line
Push the canoe out into the current and let it float downstream until the stern rope becomes taut. Try not to let all the rope out. By pulling on the downstream rope while the upstream rope is taut, you will set an angle just as you would in a back ferry and the boat will ferry away from shore. To move the boat toward shore release the downstream rope and pull in on the upstream rope. The canoe’s angle will change and the current will push the canoe toward you.
By keeping pressure on the downstream end you can have the canoe ferrying as much as 45 degrees out into the current below you.
Adjust the angle until the canoe is lined up, then slowly walk downstream while keeping the ropes taut to control the angle and the canoe’s position.
Too many people risk broken ankles and capsized canoes by relying on luck and quick feet when lining. With this under-the-hull bridle set-up, lining can be less about speed and recovery and more about control and finesse.
Practice makes perfect
Much like paddling rapids, lining is a mental game. Practising in light current with only a few obstacles present, you can learn with how the canoe interacts with the lines and the water. You need to work with the river rather than against it. The same can be said of lining with a partner—effective communication is essential.
To read more on the subtleties of this technique, check out Garrett Conover’s comprehensive book Beyond the Paddle and Bill Mason’s classic Path of the Paddle.
Mark Scriver is a Black Feather guide and the author of Canoe Camping, An Essential Guide. Johno Foster is a seasoned Black Feather guide who would rather paddle through most rapids but knows when to toe the party line.
 This article was published in Issue 73 of Paddling Magazine.
 Leading lines. | Feature photo: Johno Foster


